Keyhole Slot Guide
|
Using a keyhole slot adds a professional touch to any project that is designed to be hung on a wall. Cutting the slots before the project is assembled often makes clamping the jig much easier.
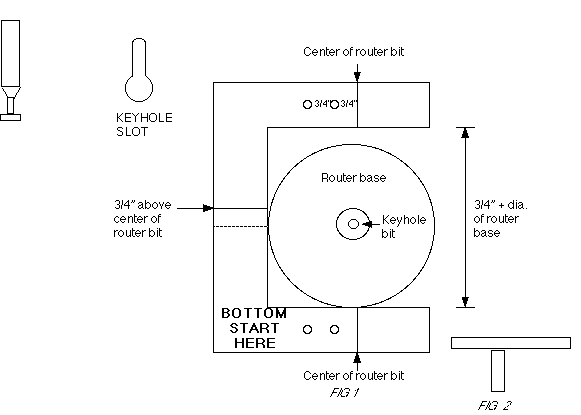
The guide is made of 3/4" plywood, cut in the shape as shown in fig. 1. Mark the three lines for the center of the bit across the top, bottom and side of the guide, add a second line on the side 3/4" above the center line, to serve as reference points when clamping the jig. When cutting slots into the flat side of a board clamp the guide from the top. When cutting into the edge of a board use the extra strip shown in fig. 2. The four holes shown in fig. 1 are to fasten a strip of 3/4" plywood as shown in fig. 2, underneath the guide, use 3/16" bolts and wing nuts. The holes closest to the lines are for the edge of 3/4" stock, the outer holes are for 1 1/2" stock. Use this strip to clamp the guide to the board. Mark the bottom of the guide as shown, "Bottom Start Here". To cut the slots fasten the guide in position, place the router in the bottom corner, plunge it down, push forward until it stops, shut router off, bring router back and lift straight up.
|